跟我一起上哈佛神課 CS50-Week 4 Memory #2022 #筆記 #中文
課程影片連結:https://video.cs50.io/nvO1sq_b_zI?screen=6knNOq4bHa4
課程大綱 (依影片時間排序):

課程筆記(依影片時間戳記,可配合影片閱讀):
0:00:00 Introduction
● 回顧上週,我們研究了記憶體以及如何用陣列儲存數據。

0:01:17 Memory 記憶體

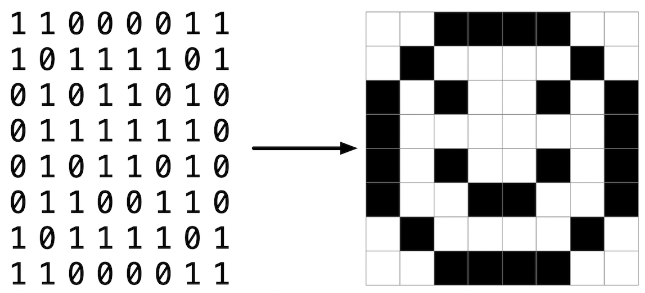
● 圖像是由有限的字節(bytes)儲存,每個字節可能代表每個像素的紅色、綠色、或藍色值。
● 更簡化來說,每個像素只需一個位元(bit)就可以表達出簡單的笑臉:
0:04:16 RGB
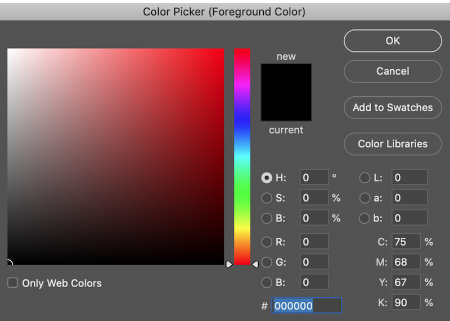
● 觀察看看幾個顏色的編碼,會發現其有跡可循:
白色 — R:255,G:255,B:255,#FFFFFF
紅色 — R:255,G:0,B:0,#FF0000
綠色 — R:0,G:255,B:0,#00FF00
藍色 — R:0,G:0,B:255,#0000FF
0:06:15 Hexadecimal 十六進位制
● 十六進位制(hexadecimal 或 base-16)有 16 位,表示方法如下:
0 1 2 3 4 5 6 7 8 9 A B C D E F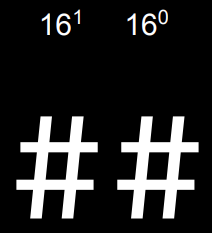
● 十六進位制的 15 會變成 0F ;十六進位制的 16 會變成 10 。
● 2 位數時,最大值為FF ,或是 16¹ x 15 + 16⁰ x 15 = 240 +15 +255。
● 儘管電腦記憶體內的值仍以二進位制的方式儲存,十六進位制的表示法有助於人類用更少的數字表示更大的數值。
0:14:12 Memory Addresses 記憶體地址
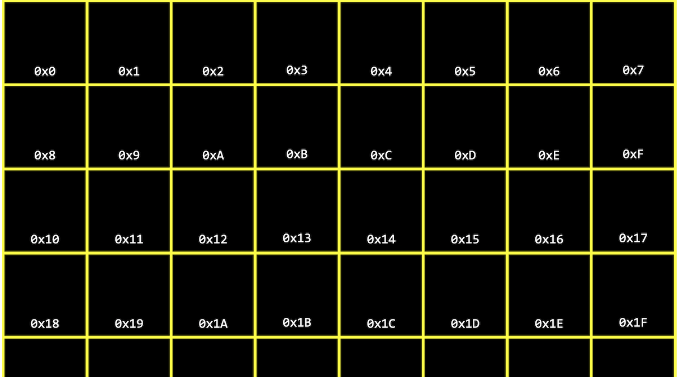
● 我們用十六進位制表示電腦記憶體內的每個地址:
0:17:27 address.c
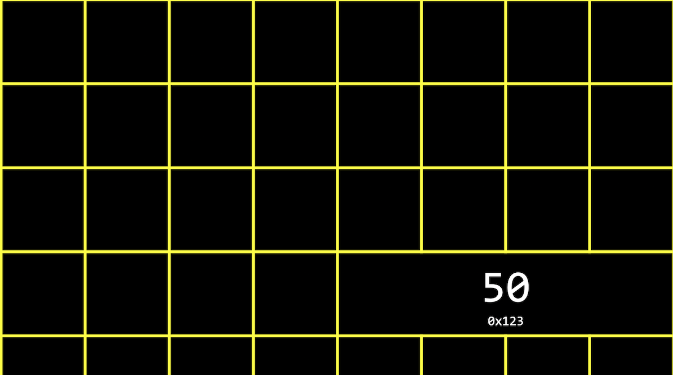
● 創造一個變數 n ,指定值為 50 ,並印出來:
#include <stdio.h>

int main(void)
{
    int n = 50;
    printf("%i\n", n);
}
● 回想一下,一個整數有 4 個 bytes(或是 32 bits):
0:19:47 Pointers 指標
● 指標(pointers)是在記憶體中儲存地址的變數。
● & 用於獲取某個變數的地址,*則可用於將變數宣告為指標。因此,要將變數n的地址儲存到指標 p 中,我們可以這樣寫:
int n = 50;
int *p = &n;
0:22:12 Address Of
● 改寫原始碼,試圖得到變數n 的地址:
#include <stdio.h>

int main(void)
{
    int n = 50;
    int *p = &n;
    printf("%p\n", p);
}
結果如下:
$ make address
$ ./address
0x7ffcb4578e5c
● %p 是使用 printf打印地址的格式碼,只在宣告變數的名稱後使用。
● 在上方例子中,我們看到地址 0x7ffcb4578e5c。 地址本身的值並不重要,因為它只是記憶體中儲存變數的某個位置; 重要的概念是我們之後可以使用這個地址。
● 我們可以運行這個程式幾次,會發現 n 在記憶體中的地址發生了變化,因為記憶體中的不同地址將在不同的時間可用。
● 雖然我們可以使用 C 語言訪問記憶體中的特定地址,當我們試圖讀取或寫入我們沒有權限的記憶體時,可能導致分段錯誤(segmentation faults)。
0:26:36 Dereference Operator 反參照運算符
● *運算符又名反參照運算符(dereference operator),可去一個地址獲取儲存在那裡的值。 例如:
#include <stdio.h>

int main(void)
{
    int n = 50;
    int *p = &n;
    printf("%p\n", p);
    printf("%i\n", *p);
}
結果如下:
$ ./address
0x7ffda0a4767c
50
0:31:13 Visualizing Pointers 視覺化指標
● 在記憶體中,我們可能有一個變數 p,它的值是某個地址的值,比如 0x123,以及另一個變數,一個值為 50 的整數,儲存在那個地址:
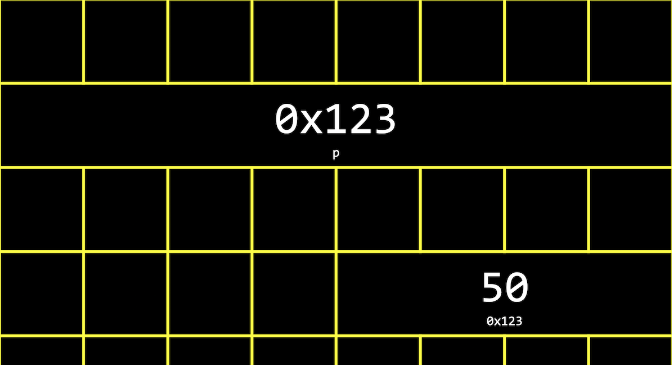
● 我們可以抽像出地址的實際值,因為當我們在程式中宣告變數,地址會有所不同。因此,我們可以簡單地將 p 視為指向記憶體中的某個值:

0:39:18 Assignment Operator 指派運算子
● =將右方的值儲存在左方的物件中,又稱為簡單指派:
#include <stdio.h>

int main(void)
{
    int n = 50;
    int *p = &n;
    int c = n; //see here!
    printf("%p\n", p);
    printf("%i\n", *p);
}
0:40:52 Strings in Memory 記憶體中的字串
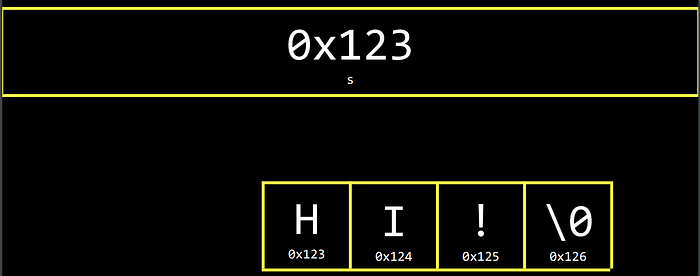
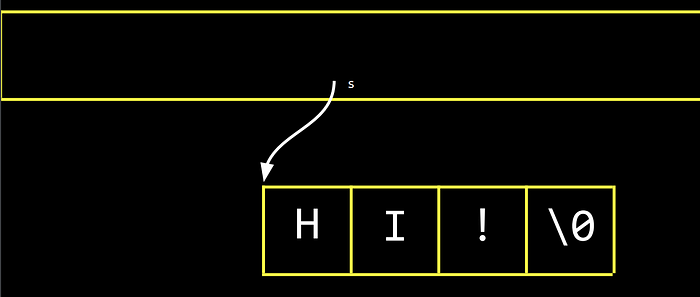
● 宣告 string s = "HI!"; ,將字串HI! 存在變數s 中。由於字串是由字元組成,我們可以透過s[0]、s[1]、s[2]和s[3] 取得每一個字元:

● 事實上,每個記憶體中的字元有其唯一的地址,s 只是一個帶有第一個字元地址的指標:
0:44:47 char *
● string s = "HI!"; 跟 char *s = "HI!"; 其實是同一件事。不使用 CS50 程式庫時,應該用 char * 表達字串:

#include <stdio.h>

int main(void)
{
    char *s = "HI!";
    printf("%s\n", s);
}
結果如下:
$ make address
$ ./address
HI!
● 試驗一下以下地址:
#include <cs50.h>
#include <stdio.h>

int main(void)
{
    string s = "HI!";
    char c = s[0]; // 將 s 的第一個字元儲存到 c 中
    char *p = &c; /
    printf("%p\n", s); // 用 %p 將 s 作為地址印出
    printf("%p\n", p); // 用 p 印出 c 的地址
}
結果如下:
$ make address
$ ./address
0x402004
0x7ffd4227fdd7 // 兩個值不同,因為我們使用 char c = s[0] 複製了第一個字元
● 再試驗一下其他字元的地址:
#include <cs50.h>
#include <stdio.h>

int main(void)
{
    string s = "HI!";
    char *p = &s[0]; // 將 s 中第一個字元的地址儲存到一個名為 p 的指標中
    printf("%p\n", p); // H 的地址
    printf("%p\n", s); // HI! 的地址
}
結果如下:
$ make address
$ ./address
0x402004
0x402004 // p 和 s 的地址相同
● 再試驗一下個別字元的地址:
# include <stdio.h>int main(void)
{
    char *s = "HI!";
    printf("%p\n", s);
    printf("%p\n", &s[0]);
    printf("%p\n", &s[1]);
    printf("%p\n", &s[2]);
    printf("%p\n", &s[3]);
}
結果如下:
$ make address
$ ./address
0x402004
0x402004
0x402005
0x402006
0x402007
● 我們之所以在 CS50 程式庫中可以使用 string,是因為我們定義 typedef char *string; 。同理我們也可以定義其他類型,例如:
typedef struct
{
    string name;
    string number;
}
person;
0:59:09 Pointer Arithmetic 指標運算
● 指標運算是將數學運算應用於指標的過程,就像使用數字一樣使用它們。
● 使用 CS50 程式庫印出各個字元:
#include <cs50.h>
#include <stdio.h>

int main(void)
{
    string s = "HI!"; // 雙引號使 complier 知道要將字元依陣列儲存在記憶體中
    printf("%c\n", s[0]);
    printf("%c\n", s[1]);
    printf("%c\n", s[2]);
    printf("%c\n", s[3]);
}
結果如下:
$ make address
$ ./address
H
I
!

$
● 不使用 CS50 程式庫印出各個字元:
#include <stdio.h>

int main(void)
{
    char *s = "HI!"; // * 代表去到那個地址
    printf("%c\n", *s); // *s 轉到儲存在 s 中的地址
    printf("%c\n", *(s + 1)); // *(s + 1) 轉到記憶體中具有下一個字元的位置
    printf("%c\n", *(s + 2));
}
● 我們可以宣告一個整數陣列,然後利用指標運算訪問他們:
#include <stdio.h>

int main(void)
{
    int numbers[] = {4, 6, 8, 2, 7, 5, 0};

    printf("%i\n", *numbers);
    printf("%i\n", *(numbers + 1)); // +1 告訴編譯器移動到陣列中的下一個值
    printf("%i\n", *(numbers + 2));
    printf("%i\n", *(numbers + 3));
    printf("%i\n", *(numbers + 4));
    printf("%i\n", *(numbers + 5));
    printf("%i\n", *(numbers + 6));    // 雖然 numbers 是一個陣列,但我們可以將它用作 *numbers 的指標
}
結果如下:
$ make address
$ ./address
4
6
8
2
7
5
0
1:09:52 compare.c
● 試著比較 user 輸入的兩個整數:
#include <cs50.h>
#include <stdio.h>

int main(void)
{
    int i = get_int("i: ");
    int j = get_int("j: ");

    if (i == j)
    {
        printf("Same\n");
    }
    else
    {
        printf("Different\n");
    }
}
結果如下:
$ make compare
$ ./compare
i: 50
j: 50
Same
$ ./compare
i: 50
j: 42
Different
// 結果如預期
● 試著比較用戶輸入的兩個字串:
#include <cs50.h>
#include <stdio.h>

int main(void)
{
    char *s = get_string("s: "); //get_string()回傳一個字元的地址
    char *t = get_string("t: ");

    if (s == t)
    {
        printf("Same\n");
    }
    else
    {
        printf("Different\n");
    }
}
結果如下:
$ make compare
$ ./compare
s: HI!
t: BYE!
Different
$ ./compare
s: HI!
t: HI!
Different
// 結果不如預期 why?
● 上方程式中的每個字串都是一個指針,char *,指向記憶體中不同的位置。 因此,即使字符串中的字元相同,它也會始終印出“不同”。
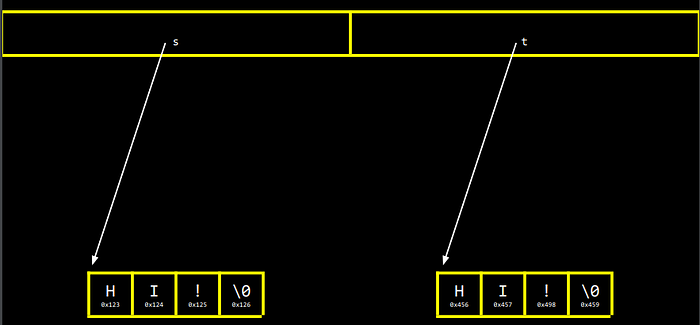
● 修改程式如下:
#include <cs50.h>
#include <stdio.h>
#include <string.h>

int main(void)
{
    char *s = get_string("s: ");
    char *t = get_string("t: ");

    if (strcmp(s, t) == 0)
    {
        printf("Same\n");
    }
    else
    {
        printf("Different\n");
    }
}
● 結果如下:
$ make compare
$ ./compare
s: HI!
t: HI!
Same
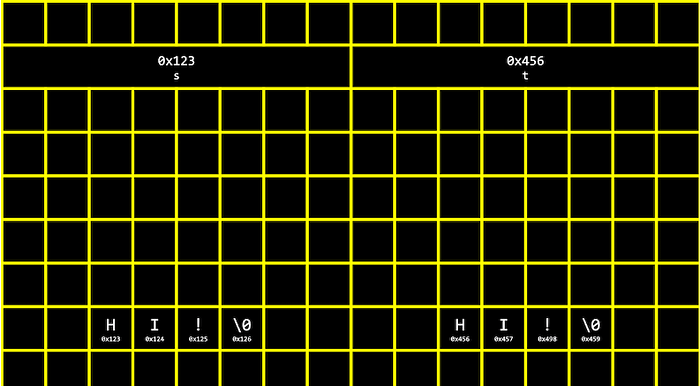
● 查看指標 s 和 t 的值:
#include <cs50.h>
#include <stdio.h>

int main(void)
{
    char *s = get_string("s: ");
    char *t = get_string("t: ");

    printf("%p\n", s); //%p 印出地址
    printf("%p\n", t);
}
結果如下:
$ make compare
$ ./compare
s: HI!
t: HI!
0x19e06b0
0x19e06f0 //值的確不相同
1:20:52 copy.c
● 試著複製一個字串:
#include <cs50.h>
#include <ctype.h>
#include <stdio.h>
#include <string.h>

int main(void)
{
    string s = get_string("s: ");

    string t = s;

    t[0] = toupper(t[0]); //將 t 的第一個字母大寫

    printf("s: %s\n", s);
    printf("t: %s\n", t);
}
● 結果如下:
$ make copy
$ ./copy
s: hi!
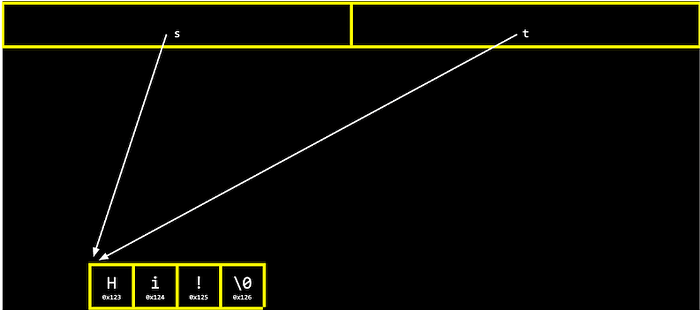
s: Hi! //結果 s 也一起大寫了,why?
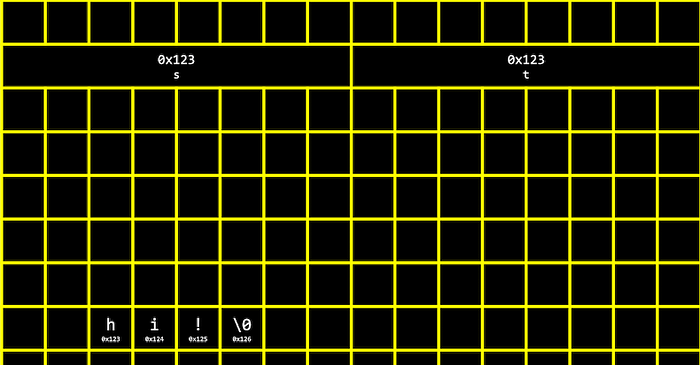
t: Hi!由於我們令s 和t 為一樣的值,即有一樣的地址,他們都指到同一個位置,所以實際上我們將同一個字元大寫,即我們只成功複製了指針:
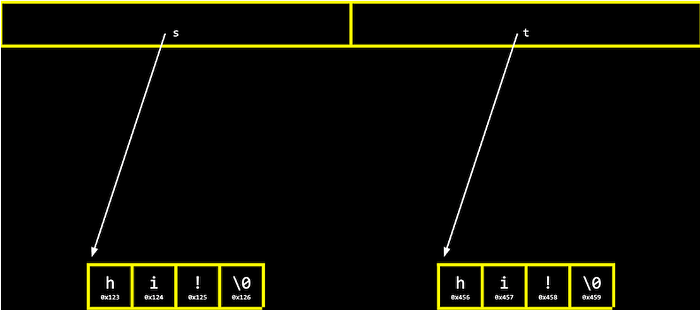
● 要真的複製一個字串,我們需要做更多工作。要將 s 中的每一個字元複製到記憶體中的其他位置。我們需要使用一個新函數malloc 在記憶體中分配空間。工作結束後要記得用 free 將記憶體標記為可用,以便作業系統可以用該空間繼續做其他事情。
● 再次嘗試複製一個字串:
#include <cs50.h>
#include <ctype.h>
#include <stdio.h>
#include <stdlib.h>
#include <string.h>

int main(void)
{
    char *s = get_string("s: ");

    char *t = malloc(strlen(s) + 1);
    // malloc 的參數是我們想要使用的 bytes
    // +1 是為了終止空字元    for (int i = 0, n = strlen(s) + 1; i < n; i++)
    // +1 是為了複製空字元
    {
        t[i] = s[i]; // 利用循環複製每一個字元
    }

    t[0] = toupper(t[0]);

    printf("s: %s\n", s);
    printf("t: %s\n", t);
}
● 結果如下:
$ make copy
$ ./copy
s: hi!
s: hi!
t: Hi!
● 也可以使用程式庫內的函數,strcpy,結果同上:
#include <cs50.h>
#include <ctype.h>
#include <stdio.h>
#include <stdlib.h>
#include <string.h>

int main(void)
{
    char *s = get_string("s: ");

    char *t = malloc(strlen(s) + 1);
    if (t == NULL) // 如果沒有記憶體,malloc 會回傳 NULL,故要檢查一下
    {
        return 1; // 表示失敗
    }    strcpy(t, s);    if (strlen(t) > 0) // 確認 t 有長度
    {
        t[0] = toupper(t[0]);
    }    printf("s: %s\n", s);
    printf("t: %s\n", t);

    free(t); // 將之前用 malloc 分配的空間還給作業作系統
    return 0; // 表示成功}
1:39:24 Valgrind
● 試著分配記憶體給一些整數:
#include <stdio.h>
#include <stdlib.h>

int main(void)
{
    int *x = malloc(3 * sizeof(int)); // 指定 3 個 int 大小的空間
    x[1] = 72; // 錯誤: 故意忘記陣列應該是由0開始索引
    x[2] = 73;
    x[3] = 33; // 錯誤: 超過記憶體範圍
    // 錯誤: 沒有 free 記憶體
}
上方的程式明顯有錯誤,編譯後卻似乎什麼都沒發生。
● valgrind 是一種命令行的工具,我們用他來檢查任何關於記憶體的問題。編譯後執行 valgrind ./memory,我們得到很多輸出:
$ valgrind ./memory
==5902== Memcheck, a memory error detector
==5902== Copyright (C) 2002-2017, and GNU GPL'd, by Julian Seward et al.
==5902== Using Valgrind-3.15.0 and LibVEX; rerun with -h for copyright info
==5902== Command: ./memory
==5902==
==5902== Invalid write of size 4
==5902==    at 0x401162: main (memory.c:9) //第九行有問題 即我們用x[3]處
==5902==  Address 0x4bd604c is 0 bytes after a block of size 12 alloc'd
==5902==    at 0x483B7F3: malloc (in /usr/lib/x86_64-linux-gnu/valgrind/vgpreload_memcheck-amd64-linux.so)
==5902==    by 0x401141: main (memory.c:6)
==5902==
==5902==
==5902== HEAP SUMMARY:
==5902==     in use at exit: 12 bytes in 1 blocks
==5902==   total heap usage: 1 allocs, 0 frees, 12 bytes allocated
==5902==
==5902== 12 bytes in 1 blocks are definitely lost in loss record 1 of 1
==5902==    at 0x483B7F3: malloc (in /usr/lib/x86_64-linux-gnu/valgrind/vgpreload_memcheck-amd64-linux.so)
==5902==    by 0x401141: main (memory.c:6)
==5902==
==5902== LEAK SUMMARY:
==5902==    definitely lost: 12 bytes in 1 blocks
==5902==    indirectly lost: 0 bytes in 0 blocks
==5902==      possibly lost: 0 bytes in 0 blocks
==5902==    still reachable: 0 bytes in 0 blocks
==5902==         suppressed: 0 bytes in 0 blocks
==5902==
==5902== For lists of detected and suppressed errors, rerun with: -s
==5902== ERROR SUMMARY: 2 errors from 2 contexts (suppressed: 0 from 0)
● 修改 x[3] 的問題:
#include <stdio.h>
#include <stdlib.h>

int main(void)
{
    int *x = malloc(3 * sizeof(int));
    x[0] = 72;
    x[1] = 73;
    x[2] = 33;
}重新編譯並執行valgrind ./memory:
$ make memory
$ ./memory
$ valgrind ./memory
==6435== Memcheck, a memory error detector
==6435== Copyright (C) 2002-2017, and GNU GPL'd, by Julian Seward et al.
==6435== Using Valgrind-3.15.0 and LibVEX; rerun with -h for copyright info
==6435== Command: ./memory
==6435==
==6435==
==6435== HEAP SUMMARY:
==6435==     in use at exit: 12 bytes in 1 blocks
==6435==   total heap usage: 1 allocs, 0 frees, 12 bytes allocated
==6435==
==6435== 12 bytes in 1 blocks are definitely lost in loss record 1 of 1 // 沒有 free 我們指定的 12 bytes
==6435==    at 0x483B7F3: malloc (in /usr/lib/x86_64-linux-gnu/valgrind/vgpreload_memcheck-amd64-linux.so)
==6435==    by 0x401141: main (memory.c:6)
==6435==
==6435== LEAK SUMMARY:
==6435==    definitely lost: 12 bytes in 1 blocks
==6435==    indirectly lost: 0 bytes in 0 blocks
==6435==      possibly lost: 0 bytes in 0 blocks
==6435==    still reachable: 0 bytes in 0 blocks
==6435==         suppressed: 0 bytes in 0 blocks
==6435==
==6435== For lists of detected and suppressed errors, rerun with: -s
==6435== ERROR SUMMARY: 1 errors from 1 contexts (suppressed: 0 from 0)
● 修改 free 的問題:
#include <stdio.h>
#include <stdlib.h>

int main(void)
{
    int *x = malloc(3 * sizeof(int));
    x[0] = 72;
    x[1] = 73;
    x[2] = 33;
    free(x);
}重新編譯並執行valgrind ./memory,就沒有錯誤了:
$ make memory
$ ./memory
$ valgrind ./memory
==6812== Memcheck, a memory error detector
==6812== Copyright (C) 2002-2017, and GNU GPL'd, by Julian Seward et al.
==6812== Using Valgrind-3.15.0 and LibVEX; rerun with -h for copyright info
==6812== Command: ./memory
==6812==
==6812==
==6812== HEAP SUMMARY:
==6812==     in use at exit: 0 bytes in 0 blocks
==6812==   total heap usage: 1 allocs, 1 frees, 12 bytes allocated
==6812==
==6812== All heap blocks were freed -- no leaks are possible
==6812==
==6812== For lists of detected and suppressed errors, rerun with: -s
==6812== ERROR SUMMARY: 0 errors from 0 contexts (suppressed: 0 from 0)
1:46:06 Garbage Values 垃圾值
● 查看以下程式碼:
#include <stdio.h>
#include <stdlib.h>

int main(void)
{
    int scores[3];
    for (int i = 0; i < 3; i++)
    {
        printf("%i\n", scores[i]);
    }
}
結果如下:
$ make garbage
$ ./garbage
68476128
32765
0
● 在沒有使用任何值初始化情況下,記憶體會先儲存垃圾值,即一些不能預測、未知、並且不能使用、無用的值。這實際上很危險,因為如果我們訪問記憶體的方式不夠仔細,例如試著訪問一個有垃圾值的地址,我們的程式很有可能產生錯誤,又或者用戶有可能因此讀取到一些來自以前程式的數據,例如密碼等。
● 觀賞影片 Pointer Fun with Binky 以瞭解上述關於指標(pointer)、 malloc、和反參照( dereferencing)的概念。影片中的代碼在程式中可能如下:
int main(void)
{
    int *x;
    int *y;

    x = malloc(sizeof(int));

    *x = 42;
    *y = 13; // 產生錯誤,因為沒有指定記憶體給 y

    y = x; // 將 y 指向和 x 同一個記憶體地址

    *y = 13;
}
1:54:31 Swap 交換
● Swap 的概念是,當我們想要交換兩種液體,一種是橙色,另一種是紫色時, 我們需要第三個玻璃杯來臨時倒入一種液體。例如:第一個玻璃杯中的橙色液體先倒入第三個玻璃杯中, 再將紫色液體倒入第一個玻璃杯中,最後將第三個玻璃杯中的橙色液體倒入第二個玻璃杯中。
1:58:00 swap.c
● 試著交換兩個整數:
#include <stdio.h>

void swap(int a, int b);

int main(void)
{
    int x = 1;
    int y = 2;

    printf("x is %i, y is %i\n", x, y);
    swap(x, y);
    printf("x is %i, y is %i\n", x, y);
}

void swap(int a, int b)
{
    int tmp = a;
    a = b;
    b = tmp;
}
結果如下:
$ make swap
$ ./swap
x is 1, y is 2
x is 1, y is 2 // 為什麼沒有 swap 呢?
上述程式碼中,swap 函數交換的是 x 和 y 的副本,即區域變數(local variables) a 和 b,因此不會交換到 main 函數中的 x 和 y。
2:01:39 Stack and Heap
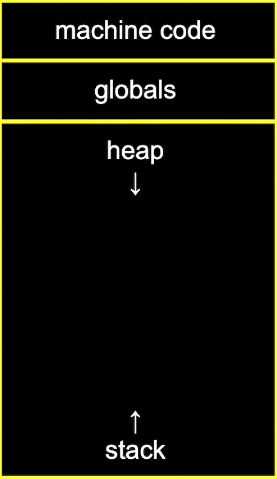
● 機器碼(machine code)是編譯程式的二進制代碼。 當我們執行程式時,該代碼會被加載到記憶體中。
● 機器碼下方的記憶體空間為程式中宣告的全域變數(global variables)。
● Heap 是一個空白區域,malloc可以從中獲得記憶體空間,由上而下分配給程式使用。
● Stack 由程式中的函數和區域變數使用,由下而上增長。
● 如果我們不停呼叫malloc ,會發生 heap overflow。反之如果我們呼叫太多函數並沒有從他們返回,則會發生 stack overflow。
2:03:52 Visualizing swap.c
● 上方 swap 程式在 stack 內看起來如下:
     -------------------------
     |  |  |  |  |  |  |  |  |
     -------------------------
     |  |  |  |  |  |  |  |  |
     -------------------------
     |  |  |  |  |  |  |  |  |
     -------------------------
     |  |  |  |  |  |  |  |  |
     -------------------------
     | tmp       |  |  |  |  |
swap -------------------------
     | a    1    | b    2    |
     -------------------------
main | x    1    | y    2    |
     -------------------------
● 在main 函數中有兩個區域變數 x和 y 。swap 函數則在main 函數上創建,並有三個區域變數a、b 和tmp 。一旦swap 返回,他的記憶體空間就會被釋放,值會變成垃圾值,並且main 函數中變數沒有改變。
2:07:22 Pointer Helpers 指標幫手
● 藉由傳遞 x 和 y 的地址,我們可以實現 swap:
void swap(int *a, int *b)
{
    int tmp = *a;
    *a = *b;
    *b = tmp;
}
● x 和 y 的地址從 main傳遞到swap與 &x和&y 交換,我們使用 int *a 來宣告我們的交換函數接受指標。
● stack 內看起來如下:
     -------------------------
     |  |  |  |  |  |  |  |  |
     -------------------------
     |  |  |  |  |  |  |  |  |
     -------------------------
     |  |  |  |  |  |  |  |  |
     -------------------------
     |  |  |  |  |  |  |  |  |
     -------------------------
     | tmp       |  |  |  |  |
swap -------------------------
     | a  0x123  | b  0x127  |
     -------------------------
main | x    1    | y    2    |
     -------------------------
現在 swap 可以返回,且 main 裡面的變數可以被改變。
● 修改後的程式碼如下:
#include <stdio.h>

void swap(int *a, int *b);

int main(void)
{
    int x = 1;
    int y = 2;

    printf("x is %i, y is %i\n", x, y);
    swap(&x, &y); // &x 使我們得到 x 的地址並傳入值
    printf("x is %i, y is %i\n", x, y);
}

void swap(int *a, int *b) // * 代表前往(go to)
{
    int tmp = *a;
    *a = *b;
    *b = tmp;
}
結果如下:
$ make swap
$ ./swap
x is 1, y is 2
x is 2, y is 1
2:12:22 scanf
● 使用 C 程式庫內的 scanf 函數,從用戶獲取一個整數:
#include <stdio.h>

int main(void)
{
    int x;
    printf("x: ");
    scanf("%i", &x); // %i 決定 input 的型態, &x 為 input的地址
    printf("x: %i\n", x);
}
結果如下:
$ make scanf
$ ./scanf
x: 50
x: 50
● 試著從用戶獲取一個字串:
#include <stdio.h>

int main(void)
{
    char *s;
    printf("s: ");
    scanf("%s", s);
    printf("s: %s\n", s);
}
結果如下:
$ clang -o scanf scanf.c
$ ./scanf
s: HI!
s: (null) // 由於沒有安排記憶體給 s,scanf將字串寫到未知的地址
● 改用 malloc安排記憶體給用戶輸入的字串使用:
include <stdio.h>
include <stdlib.h>int main(void)
{
    char *s = malloc(4);
    printf("s: ");
    scanf("%s", s);
    printf("s: %s\n", s);
}
結果如下:
$ clang -o scanf scanf.c
$ ./scanf
s: HI!
s: HI!
2:16:55 Segmentation Fault 記憶體區段錯誤
● 如果用戶輸入的字串大小超過宣告的記憶體空間,程式會爆掉(crash),並出現 Segmentation Fault 的錯誤訊息。
● 之前課堂使用過的get_string (來自 CS50 程式庫)會不斷地依照用戶輸入的字串安排記憶體,因此不會有上述問題。
2:19:18 File Input/Output 檔案輸入/輸出
● 使用指標,我們也可以打開檔案,如在 phonebook.c 中的電話簿:
// Saves names and numbers to a CSV file

#include <cs50.h>
#include <stdio.h>
#include <string.h>

int main(void)
{
    // 打開CSV檔
    FILE *file = fopen("phonebook.csv", "a"); // 打開 FILE 類型的檔案
    if (!file)
    {
        return 1;
    }

    // 得到名字和數字
    string name = get_string("Name: ");
    string number = get_string("Number: ");

    // 輸出到檔案中
    fprintf(file, "%s,%s\n", name, number);

    // 關閉檔案
    fclose(file);
● 以下程式用於打開檔案並告訴我們該檔案是否為 JPEG 檔:
// Detects if a file is a JPEG

#include <stdint.h>
#include <stdio.h>

typedef uint8_t BYTE;

int main(int argc, char *argv[])
{
    // 檢查使用
    if (argc != 2)
    {
        return 1;
    }

    // 打開檔案
    FILE *file = fopen(argv[1], "r");
    if (!file)
    {
        return 1;
    }

    // 讀取前三個bytes
    BYTE bytes[3];
    fread(bytes, sizeof(BYTE), 3, file);

    // 檢查前三個bytes
    if (bytes[0] == 0xff && bytes[1] == 0xd8 && bytes[2] == 0xff)
    {
        printf("Yes, possibly\n");
    }
    else
    {
        printf("No\n");
    }

    // 關閉檔案
    fclose(file);
}
結果如下:
$ make jpeg
$ ./jpeg .src4/lecture.jpg
Yes, possibly
● 以下程式用於過濾圖片,例如只顯示紅色:
#include "helpers.h"

// 只讓紅色通過
void filter(int height, int width, RGBTRIPLE image[height][width])
{
    // 對每一個像素進行迴圈
    for (int i = 0; i < height; i++)
    {
        for (int j = 0; j < width; j++)
        {
            image[i][j].rgbtBlue = 0x00;  // 令藍色值為 0
            image[i][j].rgbtGreen = 0x00; // 令綠色值為 0
        }
    }
}
2:25:08 This was CS50
● 十六進位制 - 補充影片: https://video.cs50.io/u_atXp-NF6w
● 指標 - 補充影片:https://video.cs50.io/XISnO2YhnsY
● 自訂類型 -補充影片:https://video.cs50.io/96M4q0OnMfY
● 動態分配記憶體 -補充影片:https://video.cs50.io/xa4ugmMDhiE
以上就是本週的課程!
如果你喜歡我的筆記 歡迎收藏或是為我鼓掌呦!
see you !
